


![[Company Logo Image]](images/sphere_smooth.gif)
MGinv3D Cluster Controller
This is the full install set for the MTX cluster controller application
![]() MGsen3D
cluster controller install V1.2.21 (2,574KB)
MGsen3D
cluster controller install V1.2.21 (2,574KB)
When using the Cluster Controller it is recommended that you use the RPC option as this avoids the difficulties in setting up the WMI machine interface. To do this, start the MGinv3D_RPC_server program on each machine that is going to be used (as well as the machine that the cluster controller program is being run on).
Also you should make sure that all machines belong to the same workgroup and that the work drive specified on the controller form is shared and the share name matches the specified drive name. The work folder name should not include spaces or other special characters.
If you get an error message when the RPC server starts that the file msstdfmt.dll is missing, then you should start a command prompt with Administrator privileges, navigate to the folder C:\Windows\SysWOW64 and enter the command:
regsvr32 msstdfmt.dll
If you do not receive a message that the file was registered successfully, then check that the file does actually exist in the folder. If it doesn't, let me know and I'll try to work out a solution.
Cluster Control for MGsen3D
If your computing environment satisfies these conditions, then you simply set up the inversion as usual, start the MGsen3D Cluster Controller program, add the computer names to the list of servers (Note each computer name can be qualified with a listener ID and the number of cores to be associated with that listener eg XPS/3/1 says that 1 core should be assigned to listener ID 3 on the machine XPS). Then select the drive and folder containing the inversion files, specify the drive and folder name to use for saving work files on each of the computers and also the number of tasks to use for performing the total mtx calculation. Each task consists of calculating the forward response for a set of observed data points and compressing the result. The Cluster Controller assigns the tasks to each server in the list and assembles the results as each task ic completed. The program interface looks like this:
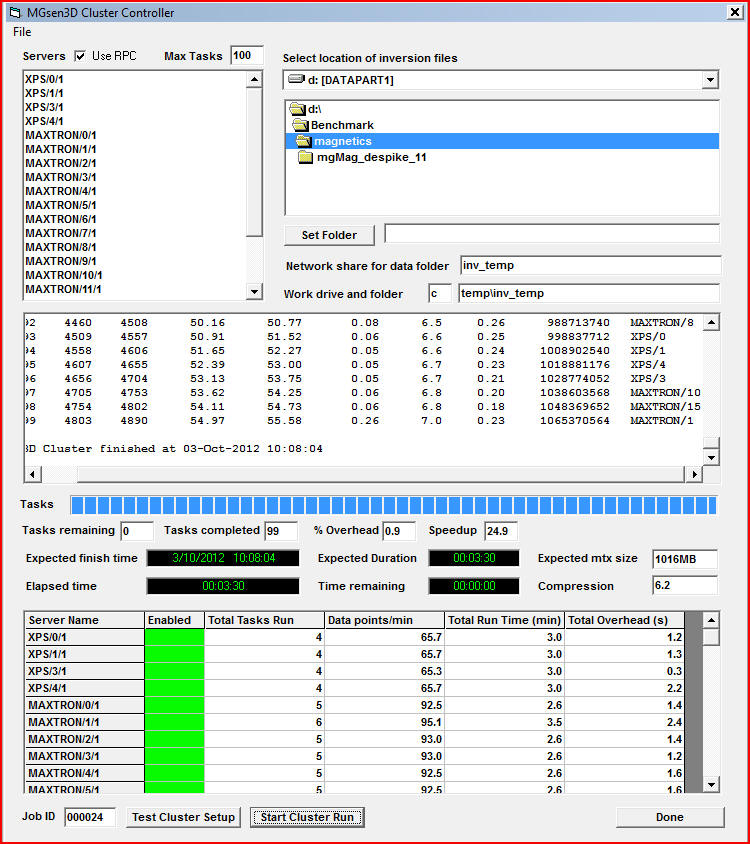
In this run the total time taken using 2 computers (XPS is a 4 core, 3.3GHz i7 975 desktop and MAXTRON is a 16 core, 3.1GHz dual Xeon E5-2687W 5160 desktop). The same run using the standard MGsen3D program took 13:45 minutes on the XPS machine and 12:06 on the MAXTRON, while the total time for the clustered version was 3:30 minutes which is a significant increase in speed.
In setting up this run each available core has been used to run a separate task rather than assigning multiple cores to utilise the parallelisation implemented within the MGsen3D program for calculating the forward model response. The reason for this is that the efficiency gains from the utilisation of multiple cores within each task is limited by the serial part of the calculation (predominantly the wavelet compression). To examine the influence of the serial part on the total execution time, the benchmark problem was run using the Cluster Controller on the MAXTRON machine with the avaialble cores divided up between all reasonable numbers of tasks (ie 1 task with 16 cores, 2 tasks with 8 cores, 3 tasks with 5 cores, 4 tasks with 4 cores, 5 tasks with 3 cores, 8 tasks with 2 cores and 16 tasks with 1 core). The graph below shows the total time taken to calculate the mtx file.
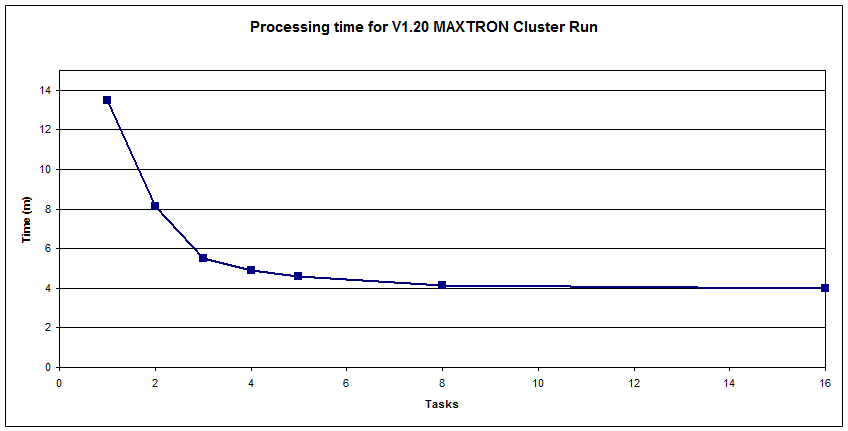
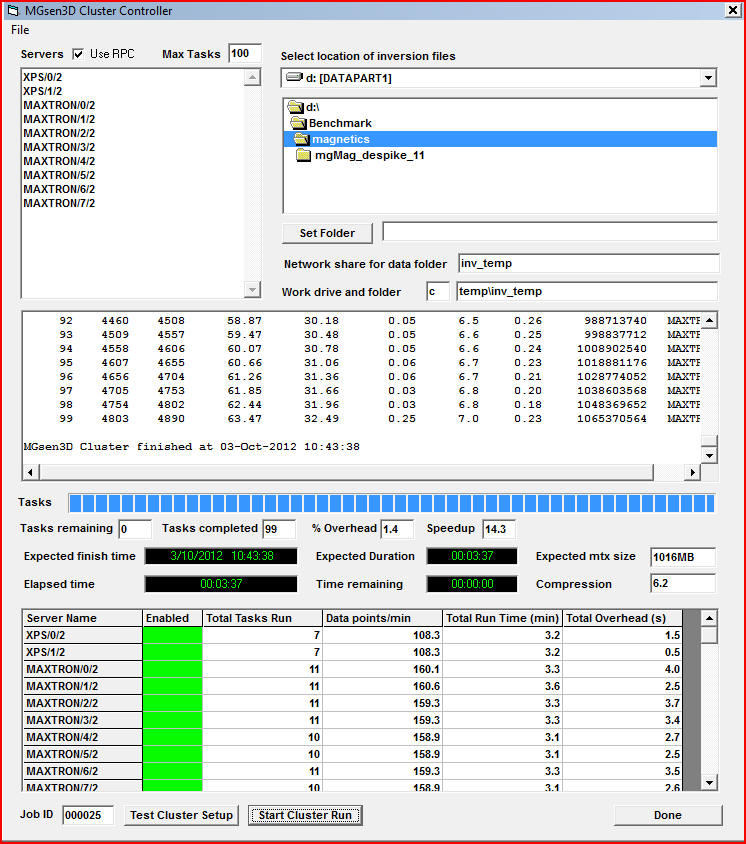
This graph shows that it is more effective to split the mtx calculation up so that each task uses a single core rather than using multiple cores for each task. This result seemed counter-intuitive at first, but simply reflects the fact that the serial part of the calculation is large enough that it is better to divide it up between multiple tasks than it is to assign multiple cores to take advantage of the paralleisation possible within each task. Though the margin for using 16x1-core tasks versus 8x2-core tasks is quite small as the graph on the MGsen3D page shows that the speedup when increasing from 1 thread to 2 is almost the optimu of 2 times. Indeed, running the Cluster Controller for the problem above but using a total of 10x2-core tasks takes a total time of 3:37 which is only marginally slower than the original 20x1-core run.
The influence of the number of tasks to use is still under investigation, but the total calculation time appears to decrease as the number of tasks increases eg 50 tasks took 4:07, 200 tasks took 3:27 and 400 tasks took 3:32. This dependency may change for larger inversions.
Old Install Sets For Previous Version 1.19
Old Install Sets For Previous Version 1.17
Setting up the WMI interface (No longer recommended!)
See this page http://msdn.microsoft.com/en-us/library/windows/desktop/aa389290(v=vs.85).aspx for information on setting up the WMI connections used by the cluster controller. This is a new tool has been added in version 1.19 to share the processing load for the mtx calculation across a number of networked computers.
For the program to work you require:
1. The account for the computer on which the controller is running has to have the same logon name and password for all computers to be used
2. The account has to have Administrator privileges on all computers
3. Any firewalls on the computers have to be configured to allow WMI access using ports 135 (for RPC) and 445 (for MS Directory Server)
4. No unresolved networking issues (and from experience, these can be many and varied)
5. All drives and folders used have to be shared and read/write permissions granted to the users
6. Enable Remote Connections by starting the System applet from the Control Panel, then clicking on the Remote Settings item and turning on the Allow connections option for Remote Desktop (try both, but reboot after you make any changes)
7. Turn off the User Account Control settings or reduce them to as low a level as possible. (There should e some way to set the permissions for the remote logon to avoid having to turn off UAC, but I haven't figured this out yet)
8. For Windows 7, dynamic RPC ports have to be enabled for the WMI remote logon to work. To check if this is causing an error message of the form "Permission denied" when establishing the server connection, start the Control panel on the remote machine, start the Administrative Tools applet, start the Event Viewer, click on the Windows Logs and select the Security log. If you see a sequence of Audit Success events with Logon, Special Logon and Logoff, then it is probable that the remote machine is allowing the logon but not enabling the required ports for the RPC calls to occur. Instructions for fixing this can be found at the link:
http://technet.microsoft.com/en-us/library/cc732839(v=ws.10).aspx
NB this entails editing the group policy settings, so proceed at your own peril! You access the Group Policy Management Editor by clicking on the Start button, typing in Group and then clicking on the Edit Group Policy item and select the Windows Settings item, then the Security Settings item, then theWindows Firewall with Advanced Security item and expand it. Then click right on the Inbound Rules item, select New Rule and follow the instructions on the link above.